Garage doors can be rather interesting pieces of a home. Most homeowners never consider the maintenance side of a garage door. Often you just push a button and expect the door to open and close without any issues. Unfortunately, that’s not always the case. In some cases, it is necessary to tighten some of the garage door parts, such as the springs. Ever wonder how to tighten garage door springs? Depending on which spring you are tightening will determine how you tighten it.
Let’s take a look below at how we can tighten side-mounted extension springs or torsion springs.
What Are The Types Of Garage Door Springs?
Believe it or not, there are two types of garage door springs. Let’s take a look below at each type.
Torsion Springs
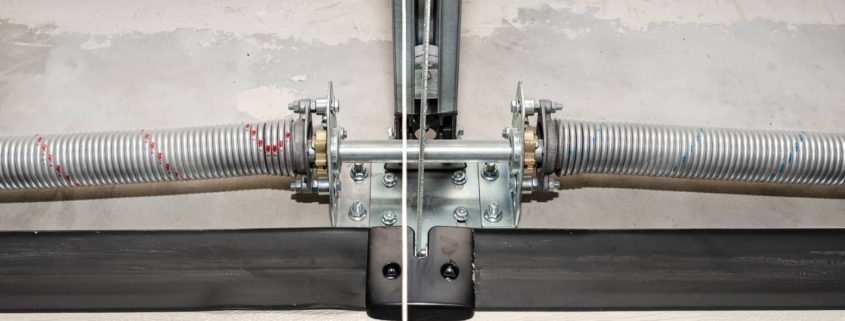
Torsion springs are most often installed as part of bigger automatic garage doors. Typically, these doors are 10 feet wide or wider. Depending on the size and weight of the door, you could see two over the shaft of the door. This type of spring requires professional adjustment. It is a very dangerous and difficult task to adjust these types of springs and it is not recommended that a homeowner attempt this. Let the professional make the adjustments.
Side-Mounted Extension Spring
You will notice these extension springs on both sides of the garage door. They are parallel to the track and cable and the pulley that holds them in place. These types of springs are easily adjusted or repaired by a homeowner. However, for your safety, reach out to a professional.
How To Tighten A Garage Door Spring – Equipment Needed
Just like with every project, tools, and materials are needed to tighten garage door springs. Let’s take a look at the suggested list of tools and materials needed for each adjustment.
- Ladder
- Safety Goggles
- Gloves
- Hard Hat
- Adjustable wrench
- Masking tape or marker
- C-clamp
- Two solid steel bars (12″ to 18″ long) (for torsion spring adjusting)
How To Tighten A Garage Door Spring – Making Adjustments
Knowing how to tighten the garage door spring is a tough task. Adjusting the garage door springs will vary. Each type has a different way of adjusting them. Let’s take look below at some steps for adjusting the springs.
Side-mounted Springs
There are 6 simple steps for adjusting or tightening the side-mounted springs on your garage door. Let’s take a look at what those steps are.
- Open the garage door and disengage it from the garage door opener.
- Place a C-clamp under the wheels at the last panel of the garage door. This ensures that the door will not shut while you are working on it.
- Detach the spring hook so that you can regulate the tension.
- Attach the spring to a hole that is higher on the track to increase the tension on the garage door. This allows you to regulate the opening and closing of the door. Reduce the tension on the side of the door where there is a gap if the garage closes unevenly.
- Increasing the safety cables requires you to shorten them by tightening the knot. If you want to reduce the tension then you will lengthen the cables by weakening the node.
- Lubricate the springs and ensure that the door is working properly.
Torsion Springs
Adjusting the torsion springs on a garage door has a different process than how you adjust the side-mounted springs. Let’s take a look below at the necessary steps.
- Ensure that the garage door is closed and install a C-clamp on the track above the last wheel. This ensures that the garage door won’t suddenly open while you’re working.
- The point where the spring ends is the location of the winding cone. Locate the winding cone so that you loosen the screws.
- Place a steel bar or winding taper into the bottom of the hole of the cone to ease the screws out.
- Regulate the extension by reducing or increasing the tension. If the door closes too quickly, you must increase the pressure by winding the cone upwards. However, if the door closes too slowly, or won’t close all of the ways, wind the cone downward so that you decrease the tension.
- Stretching the spring will require you to leave the bar in the bottom hole and remove the other one. Applying force from the bottom and up to the bar.
- Now tighten the set screws that you loosened earlier. This locks the spring into its new placement.
- Test the door and if everything is working properly, lubricate the wheels and springs and reconnect the door to your electric door opener.

Other Recommended Maintenance
Now that you understand how to tighten your garage door springs you should probably start looking into when it is a good time to replace the garage door. If you are experiencing the need to make repairs to your garage door on a regular basis, you will want to replace it. Be sure to call a professional and your local home inspection team to make the right garage door selection.
Next, it is possible that you aren’t even sure where to begin with your garage door maintenance. If this is you, be sure to read up on how to inspect your garage door and springs. This information can save you a lot of time and money. Knowing more about the process will also help reduce any added maintenance stress.
Lastly, there are always recommended safety tips when dealing with anything that is mechanical. Garage doors seem easy to move, however, they are rather heavy. Understanding the dangers that your garage door could provide is key to keeping your family safe.
When Do I Call A Professional?
When it comes to tightening garage door springs or fixing or repairing garage doors, it is a great idea to call a professional garage door installation company. They are more equipped and have the expertise to adjust your springs so that the garage door functions correctly. Also, it is a great idea to put the garage door down on your yearly maintenance list. This ensures that the door or doors are working properly throughout the year. Additionally, reach out to your local home inspection team for a full garage door inspection during a full home inspection. Consequently, they can recommend a reputable garage door installation and repair company.
Conclusion
The moment that you have to tighten the garage door spring or have issues with the garage door, is the moment when you want to call a professional for help. Most homeowners are not equipped with the proper tools to conduct any garage door repairs. Additionally, if you do not know what you are doing, there can be a substantial safety hazard while conducting garage door repair. Call on your local home inspection team and they can check to see if your garage door needs any repairs or updating. Reach out to Blue Guardian Home Inspections for a full home inspection in Kendall, Kane, Dupage, and LaSalle Counties of Illinois.